Batch Exporter Documentation
Complete guide to installing, configuring, and using Batch Exporter to batch export your Revit views and sheets to multiple formats with just a few clicks.
Supported Revit Versions
- Revit 2022
- Revit 2023
- Revit 2024
- Revit 2025
- Revit 2026
- Revit 2027
Installation
Make sure all running instances of Autodesk Revit are closed before starting the installation.
.exe file and follow the installation wizard. Select which Revit versions to install for and accept the licence agreement and privacy policy.Quick Start Guide
Follow these steps to export your first batch of views and sheets:
Open Batch Exporter
With your Revit project open, navigate to the Add-Ins tab in the ribbon and click on Batch Exporter. The main dialog window will open.
Select Views and Sheets
In the Batch Exporter dialog, you'll see a datagrid view of all available views and sheets in your project. Check the boxes next to the items you want to export, or use Select All for everything.
Choose Export Formats
Select one or more export formats from the format panel:
Export
Click Browse to select your output folder, then click the Start Export button. A progress bar will show the export status, and you'll receive a summary when complete.
Create custom naming profiles using Revit parameters to automatically generate consistent file names. Save and load your profiles for quick access across projects.
Selection Tab
The Selection Tab is where you choose which views and sheets to export. It displays all exportable content from your Revit project in a sortable datagrid view.
Datagrid Navigation
- Click on column headings to sort the datagrid
- Use the search box to quickly filter items by name
- Toggle between Sheets and Views using the radio buttons
- Right-click on selected views/sheets to open them in Revit
Selection Controls
- Use CTRL and SHIFT to select multiple views and sheets
- Use the Select All and Select None buttons for quick selection
- Create, update, or delete View/Sheet Sets using the toolbar buttons
- Use the dropdown to select existing View/Sheet Sets from your model
- With a licence, check Show only active Sheets/Views to filter the list
Naming Profiles
Create custom naming templates using dynamic tokens:
- {SheetNumber} - The sheet number from Revit
- {SheetName} - The sheet name
- {Revision} - Current revision number
- {Date} - Export date
- {ProjectName} - Revit project name
- {ViewType} - Type of view being exported
View/Sheet Sets
Save collections of views and sheets for quick selection:
- Create sets based on discipline (Architectural, Structural, MEP)
- Save sets for specific deliverables or milestones
- Share sets across team members via export/import
Formats Tab
The Formats Tab lets you choose which file formats to export and configure format-specific settings. Select one or more formats and adjust their individual options before exporting.

Create Tab
The Create Tab is where you start your export. Select your output folder, choose a naming profile, and click the Start Export button to begin exporting your selected views and sheets.
Schedule Tab
The Schedule Tab enables automated exports at specified times. This is a Pro feature that allows you to set up recurring exports without manual intervention.
Scheduled exports require a Pro license. Upgrade to Pro to access this feature.
The Revit model must be left open for scheduled exports to run. Ensure your computer remains on and Revit stays open with the project loaded.
Setting Up Scheduled Exports
- Time - Set the time of day for exports to run
- Frequency - Daily, weekly, or custom intervals
- Views/Sheets - Select which items to include
- Formats - Choose export formats for scheduled jobs
- Destination - Set output folder for scheduled exports
Use Cases
- Overnight exports of large sheet sets
- Regular updates to shared project folders
- Automated coordination model exports for BIM workflows
- Weekly deliverable generation
AI Assistant Tab
The AI Assistant Tab provides a natural language interface powered by Claude AI. Simply type what you want to do and the AI will help you select views, configure exports, and answer questions about your project.
The AI Assistant requires a Pro license. Upgrade to Pro to access this feature.
Example Commands
- "Select all A1 sheets" - Selects sheets by size
- "Export 1:100 floor plans to PDF" - Filter by scale and export
- "Select structural views" - Filter by discipline
- "How many sheets are selected?" - Query your selection
- "Deselect all section views" - Remove items from selection
Quick Actions
Pre-configured buttons for common tasks:
- Select all A1 sheets
- Select 1:100 floor plans
- Export selected to PDF
- Export A1 sheets to DWG
- Count selected items
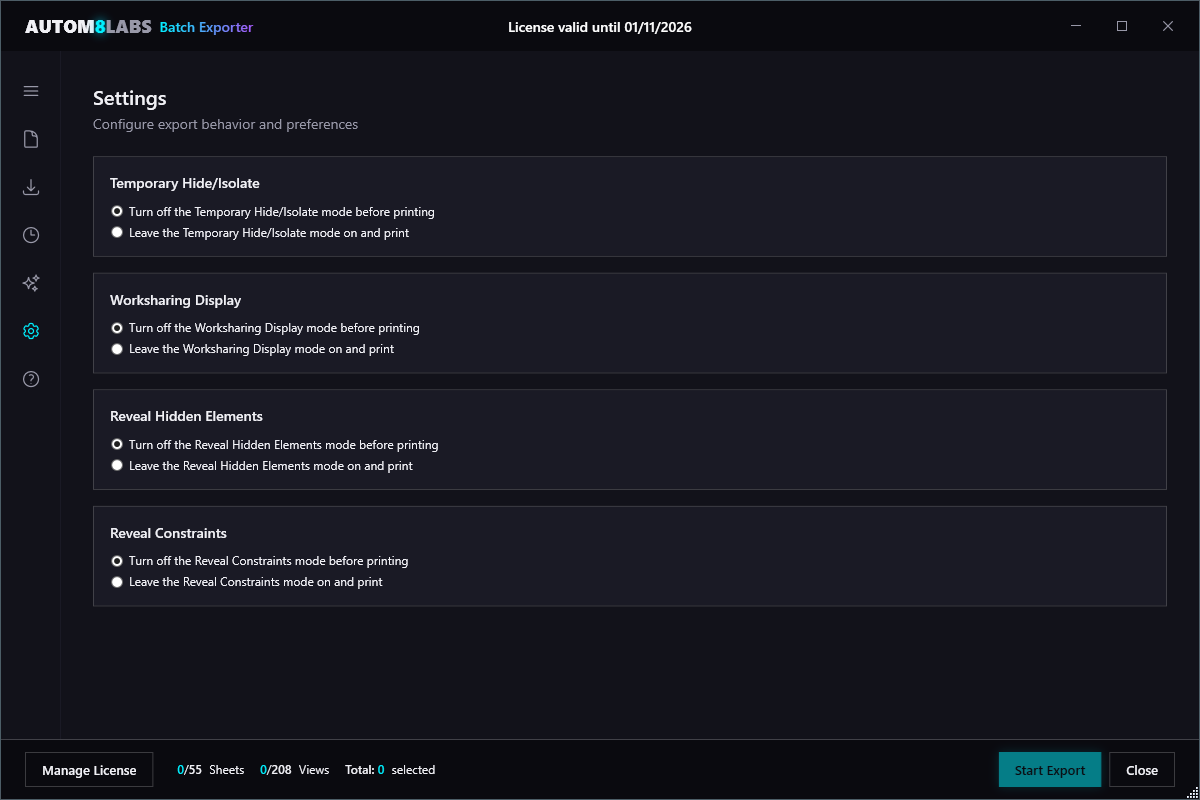
Settings Tab
The Settings Tab contains global options that apply to all exports, including naming conventions, folder structure, and advanced options.
General Settings
- Output Folder - Default destination for exports
- Naming Convention - Default file naming pattern
- Overwrite Existing - Replace or rename duplicate files
- Open Folder After Export - Automatically open destination
Advanced Settings
- View Cleanup - Hide/isolate options during export
- Worksharing - Synchronize before export options
- PCP Files - Automatic cleanup of plot configuration files
- DWG/DGN Setup - Export setup selection
Help Tab
The Help Tab provides quick access to documentation, support resources, and license information.
Available Resources
- Documentation - Link to this online documentation
- Video Tutorials - Step-by-step video guides
- Contact Support - Email support for Pro users
- License Info - View your license status and details
- Check for Updates - See if a newer version is available
- About - Version information and credits
PDF Export
Export sheets to PDF format with configurable options:
- Paper Size - Automatic from sheet or custom size
- Resolution - 150, 300, or 600 DPI
- Color Mode - Color, grayscale, or monochrome
- Combine PDFs - Merge all sheets into a single PDF file
DWG Export
Export to AutoCAD DWG format for 2D CAD workflows:
- AutoCAD Version - Compatibility from 2010 to 2024
- Layer Mapping - Custom layer name configuration
- Units - Automatic unit conversion options
- Coordinates - Export shared coordinates
DGN Export
Export to MicroStation DGN format for interoperability:
- DGN Version - V7 or V8 format support
- Level Mapping - Custom level name configuration
- Units - Automatic unit conversion options
- Coordinates - Export shared coordinates
IFC Export
Export to Industry Foundation Classes format for BIM coordination:
- IFC Version - IFC 2x3 or IFC 4
- MVD - Coordination View or Reference View
- Property Sets - Configure included properties
- Site/Building - Export location options
NWC Export
Export to Navisworks Cache format for clash detection and review:
- Parameters - Convert element parameters
- Room Geometry - Include room boundaries
- Levels - Option to divide file by levels
Image Export
Export views as raster images (PNG, JPG, TIFF):
- Format - PNG, JPG, or TIFF
- Resolution - Custom pixels per inch
- Size - Fit to page or custom dimensions
- Background - Transparent (PNG only)
Troubleshooting
Batch Exporter doesn't appear in the ribbon
If Batch Exporter is not visible in the Add-Ins tab:
- Ensure Revit was completely closed during installation
- Check that the add-in is not disabled in Revit Options → Add-Ins
- Verify the installation folder contains the required files
- Try reinstalling Batch Exporter with administrator privileges
Export fails or hangs
If exports are failing or the progress stops:
- Check available disk space in the output directory
- Ensure you have write permissions to the output folder
- Try exporting a smaller batch to isolate the problem
- Check the Revit journal files for detailed error information
For very large projects with 100+ sheets, consider exporting in smaller batches to avoid memory issues.
Frequently Asked Questions
License terms depend on your subscription type. Single-user licenses are valid for one computer, while team licenses allow installation on multiple machines. Contact us for volume licensing options.
Yes, Batch Exporter fully supports workshared models. You can export views and sheets from locally cached files or central models without any issues.
Yes! Scheduled exports are available with a Pro license. You can set up recurring exports at specific times - daily, weekly, or custom intervals. See the Schedule Tab documentation for details.
There's no hard limit on the number of sheets. Performance may vary based on your system resources and project size. For very large batches (100+ sheets), we recommend exporting in groups for optimal performance.
Changelog
- Floating licences: share a pool of concurrent seats across your team, with seats returned automatically when Batch Exporter closes
- More robust licence activation and validation
- Fixed an issue where updating a View/Sheet Set could fail with a Print Range error
- Performance and stability improvements
- Smarter update prompts so you always get critical fixes promptly
- Cleaner update notification dialog
- Stability and polish improvements
- Reliability fixes for batch export workflows
- Stability and performance improvements
- Added support for Autodesk Revit 2027
- New AutoCAD image-embedding plugin for reliable image handling in DWG exports
- AI assistant improvements: Restored focus to Revit, faster typing, and polished responses
- Fixed naming profile Save As and parameter selection edge cases
- Faster dropdown menus and more consistent dialog styling across all windows
- Performance and stability improvements
- Improved installer experience
- Performance and stability improvements
- Fixed IFC and NWC export across all Revit versions
- AI-powered revision management
- Fixed memory leaks and improved exception handling
- Fixed trial usage tracking and monthly quota enforcement
- Improved PDF paper size handling
- Fixed naming profile parameter lookup and sample values
- UI improvements and dialog styling updates
- New branded installer
Initial Release
- Batch export to PDF, DWG, DGN, IFC, NWC, FBX, and image formats
- Customizable naming conventions with dynamic tokens
- Automatic folder organization by discipline or sheet set
- Support for Autodesk Revit 2022 through 2026
- Export presets for saving and reusing configurations