MCP Connector for Navisworks Documentation
Complete guide to installing, configuring, and using MCP Connector for Navisworks - 93 MCP tools, including the 30 free read-only tools, driven by Claude Desktop, ChatGPT Desktop, Cursor, or Claude Code.
Supported Navisworks Versions
- Navisworks 2022
- Navisworks 2023
- Navisworks 2024
- Navisworks 2025
- Navisworks 2026
- Navisworks 2027
Navisworks Manage or Simulate is required. Navisworks Freedom (the free viewer) does not run add-ins. Windows 10 or 11, 64-bit.
AI Applications
- Claude Desktop
- ChatGPT Desktop
- Cursor
- Claude Code
- VS Code (GitHub Copilot agent mode)
- Visual Studio 2022 17.14+ / 2026 (GitHub Copilot)
- GitHub Copilot CLI
- Grok Build (xAI CLI)
Installation
Make sure all running instances of Autodesk Navisworks are closed before starting the installation.
.exe file and follow the installation wizard, accepting the licence agreement and privacy policy. One install covers every supported Navisworks release, so there is nothing to choose.
Enabling MCP Connector for Navisworks
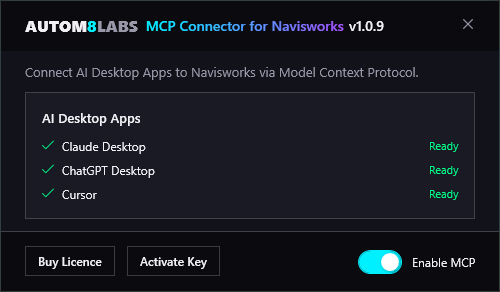
After installation, click the MCP Connector button on the AUTOM8LABS tab to open the connector dialog, then toggle Enable MCP to start the connection. No licence key is needed for the free tools - the key only unlocks the Pro set.
The dialog shows the status of detected AI applications:
- Ready (Running) - The AI application is configured to reach Navisworks and is currently open
- Ready - Configured, but the application is not running right now
- Detected - The application is installed but not yet configured; toggle Enable MCP to configure it
- Not Detected - The AI application is not installed on this machine
Toggling Enable MCP off again removes the connector from every detected client's configuration.
Configuration
MCP Connector for Navisworks includes one-click auto-configuration for supported AI applications. Toggling Enable MCP in the connector dialog writes the configuration for every detected application at once. The installer also registers the server on install, so in most cases there is nothing to do by hand.
Claude Desktop
The config file is located at:
%APPDATA%\Claude\claude_desktop_config.json
The Microsoft Store build never reads %APPDATA%\Claude - Windows redirects that folder into a sandboxed package location. MCP Connector for Navisworks detects the Store package and writes to both paths, so the Store build is configured automatically. The redirected file lives here:
%LOCALAPPDATA%\Packages\Claude_<hash>\LocalCache\Roaming\Claude\claude_desktop_config.json
If tools still do not appear, fully quit Claude from the system tray (closing the window is not enough) and reopen it.
ChatGPT Desktop
ChatGPT appears in the dialog when it is installed on your machine. The config file is located at:
%USERPROFILE%\.codex\config.toml
This file is shared with the Codex CLI, so configuring ChatGPT Desktop makes the Navisworks tools available in Codex CLI as well. After configuring, fully quit ChatGPT and reopen it. With Navisworks open and a model loaded, a quick test is to ask ChatGPT to "ping Navisworks".
Use Work, not Chat. ChatGPT Desktop loads MCP servers from this config file in its Work area only - regular Chat conversations cannot see the Navisworks tools. If ChatGPT replies that the Navisworks MCP is not connected, check you are in Work first, then start a fresh conversation - the MCP connection is per-conversation and drops after sitting idle.
Cursor
The config file is located at:
%USERPROFILE%\.cursor\mcp.json
GitHub Copilot
GitHub Copilot appears in the dialog when VS Code, Visual Studio, or the Copilot CLI is installed on your machine. The config files are located at:
%APPDATA%\Code\User\mcp.json
%USERPROFILE%\.mcp.json
%USERPROFILE%\.copilot\mcp-config.json
Grok Build
Toggle Enable MCP and the connector writes its entry into xAI's Grok Build CLI configuration automatically. The config file is located at:
%USERPROFILE%\.grok\config.toml
Grok Build also reads Claude Code's and Cursor's MCP config, so if you have already configured either of those the connector shows up in Grok Build with no extra step.
Claude Code & other MCP clients
MCP Connector for Navisworks exposes a standard MCP stdio server, so it also works with Claude Code, VS Code, and any other MCP-compatible client. The server is a single executable installed with the plug-in bundle:
C:\ProgramData\AUTOM8LABS\MCPConnectorNavisworks\Bridge\MCPConnectorNavisworks.Bridge.exe
Register it in Claude Code from a terminal:
claude mcp add AUTOM8LABS_Navisworks -- "C:\ProgramData\AUTOM8LABS\MCPConnectorNavisworks\Bridge\MCPConnectorNavisworks.Bridge.exe"
Manual configuration (any MCP client)
Add this to your client's MCP server configuration:
{
  "mcpServers": {
    "AUTOM8LABS_Navisworks": {
      "command": "C:\\ProgramData\\AUTOM8LABS\\MCPConnectorNavisworks\\Bridge\\MCPConnectorNavisworks.Bridge.exe"
    }
  }
}
VS Code
VS Code uses a slightly different shape. Add the server to your MCP configuration (for example .vscode/mcp.json in a workspace):
{
  "servers": {
    "AUTOM8LABS_Navisworks": {
      "type": "stdio",
      "command": "C:\\ProgramData\\AUTOM8LABS\\MCPConnectorNavisworks\\Bridge\\MCPConnectorNavisworks.Bridge.exe"
    }
  }
}After changing MCP configuration, restart the AI client completely for the changes to take effect.
Claude Desktop Settings
MCP Connector for Navisworks exposes 95 tools, including two Bridge recovery tools. In Claude Desktop, enable Load tools when needed so tools are loaded on demand rather than all at once.

Use Chat, not Cowork
Claude Desktop has a mode selector at the bottom of the message box: Chat and Cowork. MCP connectors run in Chat conversations. In Cowork, your Navisworks requests will not reach the connector and Claude behaves as if Navisworks is not connected - even though the connector is configured correctly. Before you start, check the selector is set to Chat.
Note this is the opposite way round to ChatGPT Desktop, where the Navisworks tools are available in Work rather than regular Chat.

Local AI Setup
Connect a local AI model to Navisworks through an MCP-compatible app. These steps are for Windows, on the same computer as Navisworks.
1. Prepare Navisworks
- Install MCP Connector for Navisworks and open a sample model.
- On the AUTOM8LABS tab, click MCP Connector and turn on Enable MCP. Keep Navisworks open.
- In your AI app, download or select a local model that supports tool calling.
2. Configure your app
Use this entry for Navisworks 2022 to 2027.
{
  "mcpServers": {
    "AUTOM8LABS_Navisworks": {
      "command": "C:\\ProgramData\\AUTOM8LABS\\MCPConnectorNavisworks\\Bridge\\MCPConnectorNavisworks.Bridge.exe"
    }
  }
}
For separate fields, use AUTOM8LABS_Navisworks as the name, stdio as the transport, and the command path with single backslashes and no quotes. Leave Arguments blank for this example.
Edit an existing connector entry rather than adding a duplicate. Keep its arguments, environment and tool settings. In an existing JSON file, add only AUTOM8LABS_Navisworks inside mcpServers, preserving other entries.
Choose your app below. Connection tested means registration, tool discovery and reconnection were checked using the Revit connector. These Navisworks steps use the same app settings; they have not been tested end to end with every app and model.
- Open Settings > Agent Skills once to create the configuration file.
- Click the app version number > Open storage. Open
plugins/anythingllm_mcp_servers.jsonand add the entry. - Return to Agent Skills and click Refresh. Check the connector is running.
- Start your test prompt with
@agent.
- Open MCP connections and look for
AUTOM8LABS_Navisworks, including paused entries. - Use that connection if present. Otherwise, add one using the name and command above.
- Enable the connection and choose your local model.
- Open Settings > MCP > MCP Servers > Add > Import from JSON.
- Paste the JSON, enable the server and check its tools appear.
- Open Work > your Agent's menu > Edit > MCP and enable the connector for that Agent.
- Select your local model and start a conversation with that Agent.
- Open Settings > MCP Servers > Add MCP Server.
- Select STDIO and enter the name and command above.
- Save, then enable the server. A green indicator confirms it is active.
- In the right sidebar, open Program > Install > Edit mcp.json.
- Add the connector inside
mcpServersand save. - Check the connector is available and enabled for your chat.
- Sign in to your local installation. Open MCP settings > Import JSON.
- Paste the JSON. The import applies immediately.
- Enable the connector and MCP tool use for your chat.
These steps apply to 2026.9.11. Other versions may differ. See Unsloth's current guide.
3. Test the connection
With your sample model open, ask:
Use the Navisworks connector to tell me the active model name and Navisworks version. Do not change anything.
In AnythingLLM, prefix this with @agent. Confirm a connector tool runs and the answer matches your open model.
Tool loading and model limits
If available, enable tool selection or on-demand loading and start with a few read-only tools. Large tool lists can exceed a local model's context. A larger context setting alone does not guarantee reliable tool use.
Operator Skill
MCP Connector for Navisworks ships with a free operator skill - a plain text playbook Claude reads before touching your model. It teaches Claude to use the connector efficiently: read in bulk instead of one entity at a time, verify answers with counts, batch edits in one call, and say so instead of guessing when something cannot be done. The result is fewer calls, fewer dead chats, and far less of your usage allowance burned on a single question.
Install in Claude Desktop:
- Download the skill: navisworks-connector.zip
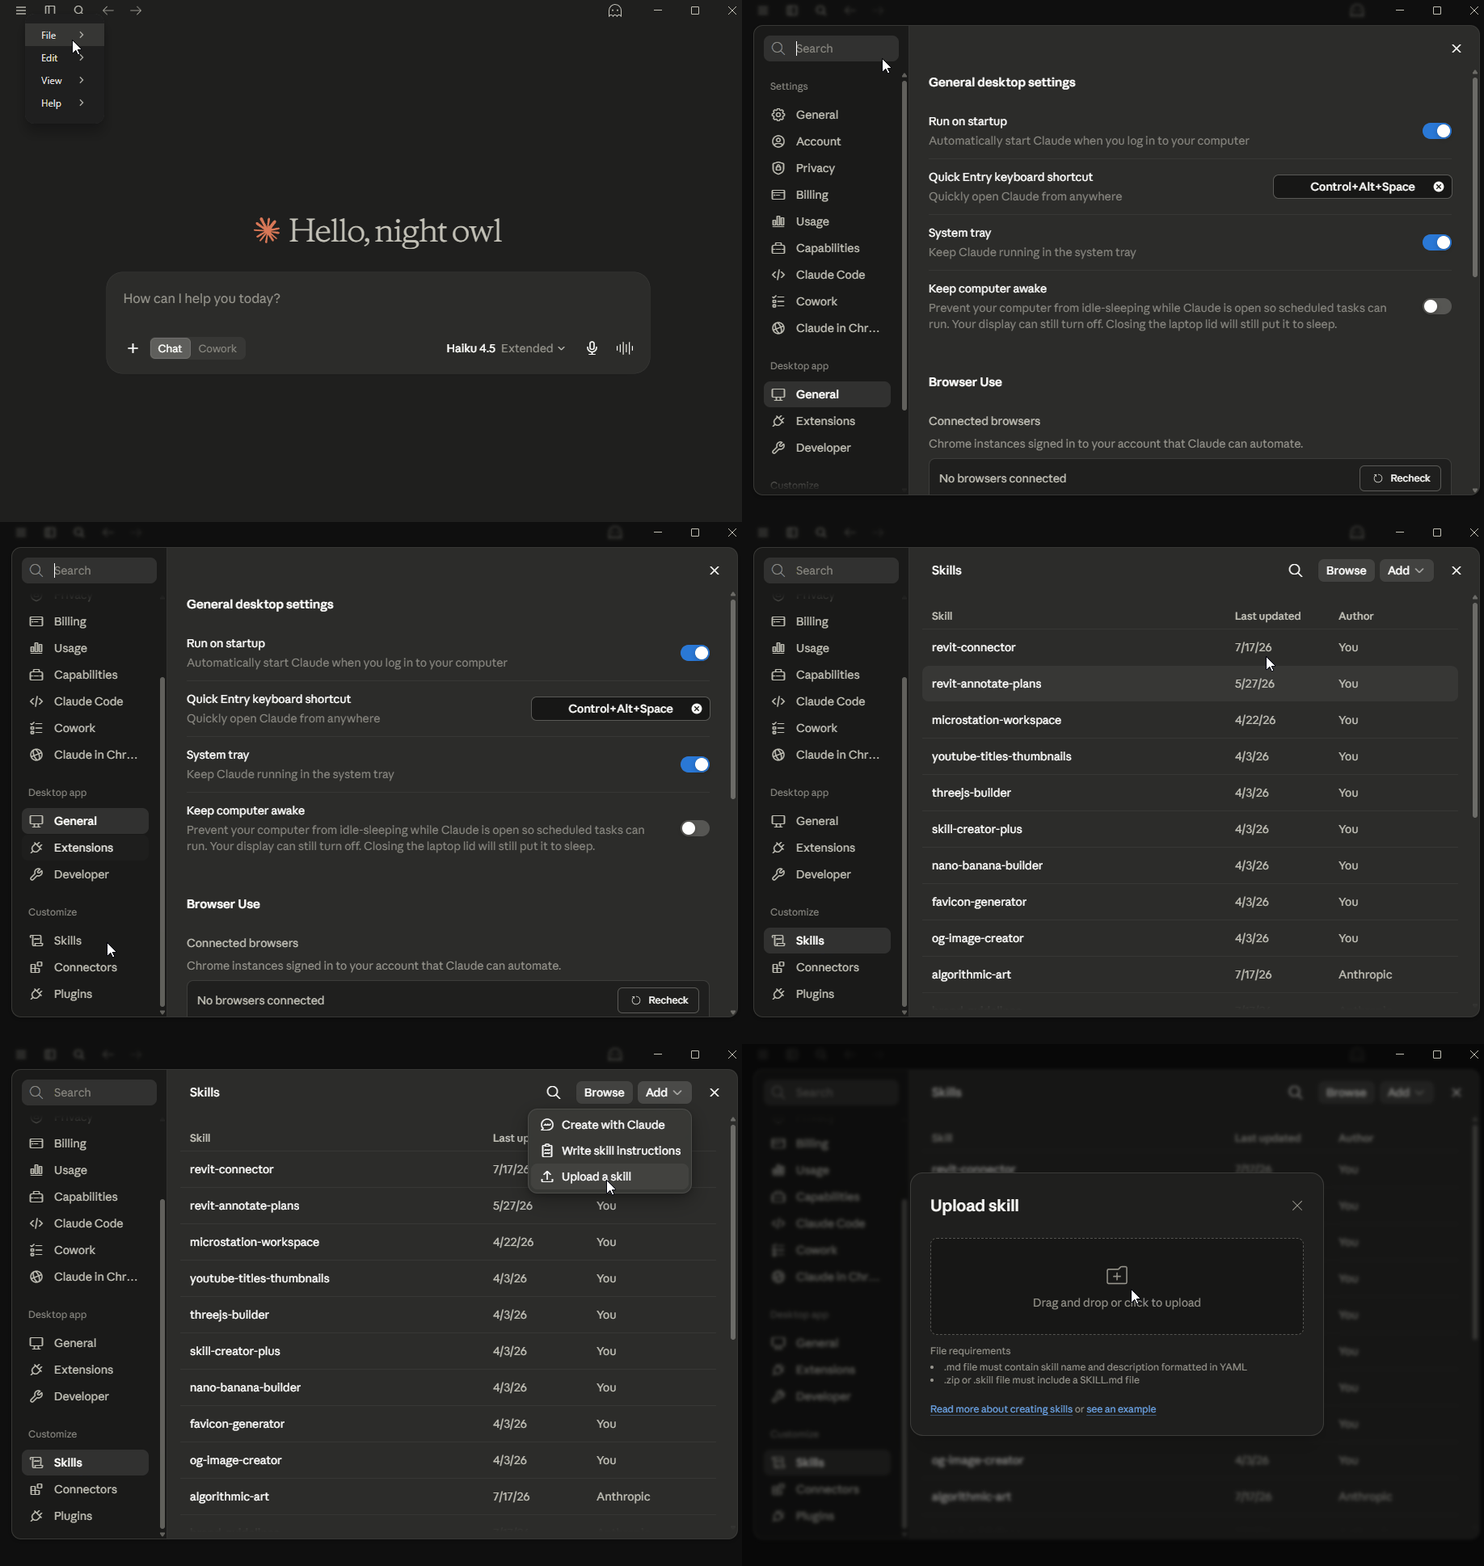
- In Claude Desktop, go to Settings > Skills > Add > Upload a skill and select the zip.
- That is it - Claude picks the skill up automatically in new chats. If you ever find it has not, mention it in your prompt, for example "Follow the navisworks-connector skill".
Using Claude Code or Cursor instead? Install steps for both are in the mcp-connector-skills repository, which also hosts free skills for the rest of the MCP Connector family.
Quickstart
ping tool. You should get back "Connected to Navisworks."Power BI Dashboards
Free dashboards for clash coordination and tool-use records. MCP Connector Pro is required to export clash results or record audit logs.
Coordination dashboard
A ready-made Power BI report that turns Clash Detective results into a coordination
dashboard: current clash counts, the trend from one coordination run to the next,
clashes by test and status, a clash matrix, a clash list with both elements, and health
checks. It reads the snapshots that export_clash_results writes, so it needs
a Pro licence, version 1.1.0 or later, and Navisworks Manage.
Download: Coordination Analytics v1.0.0 (.zip)
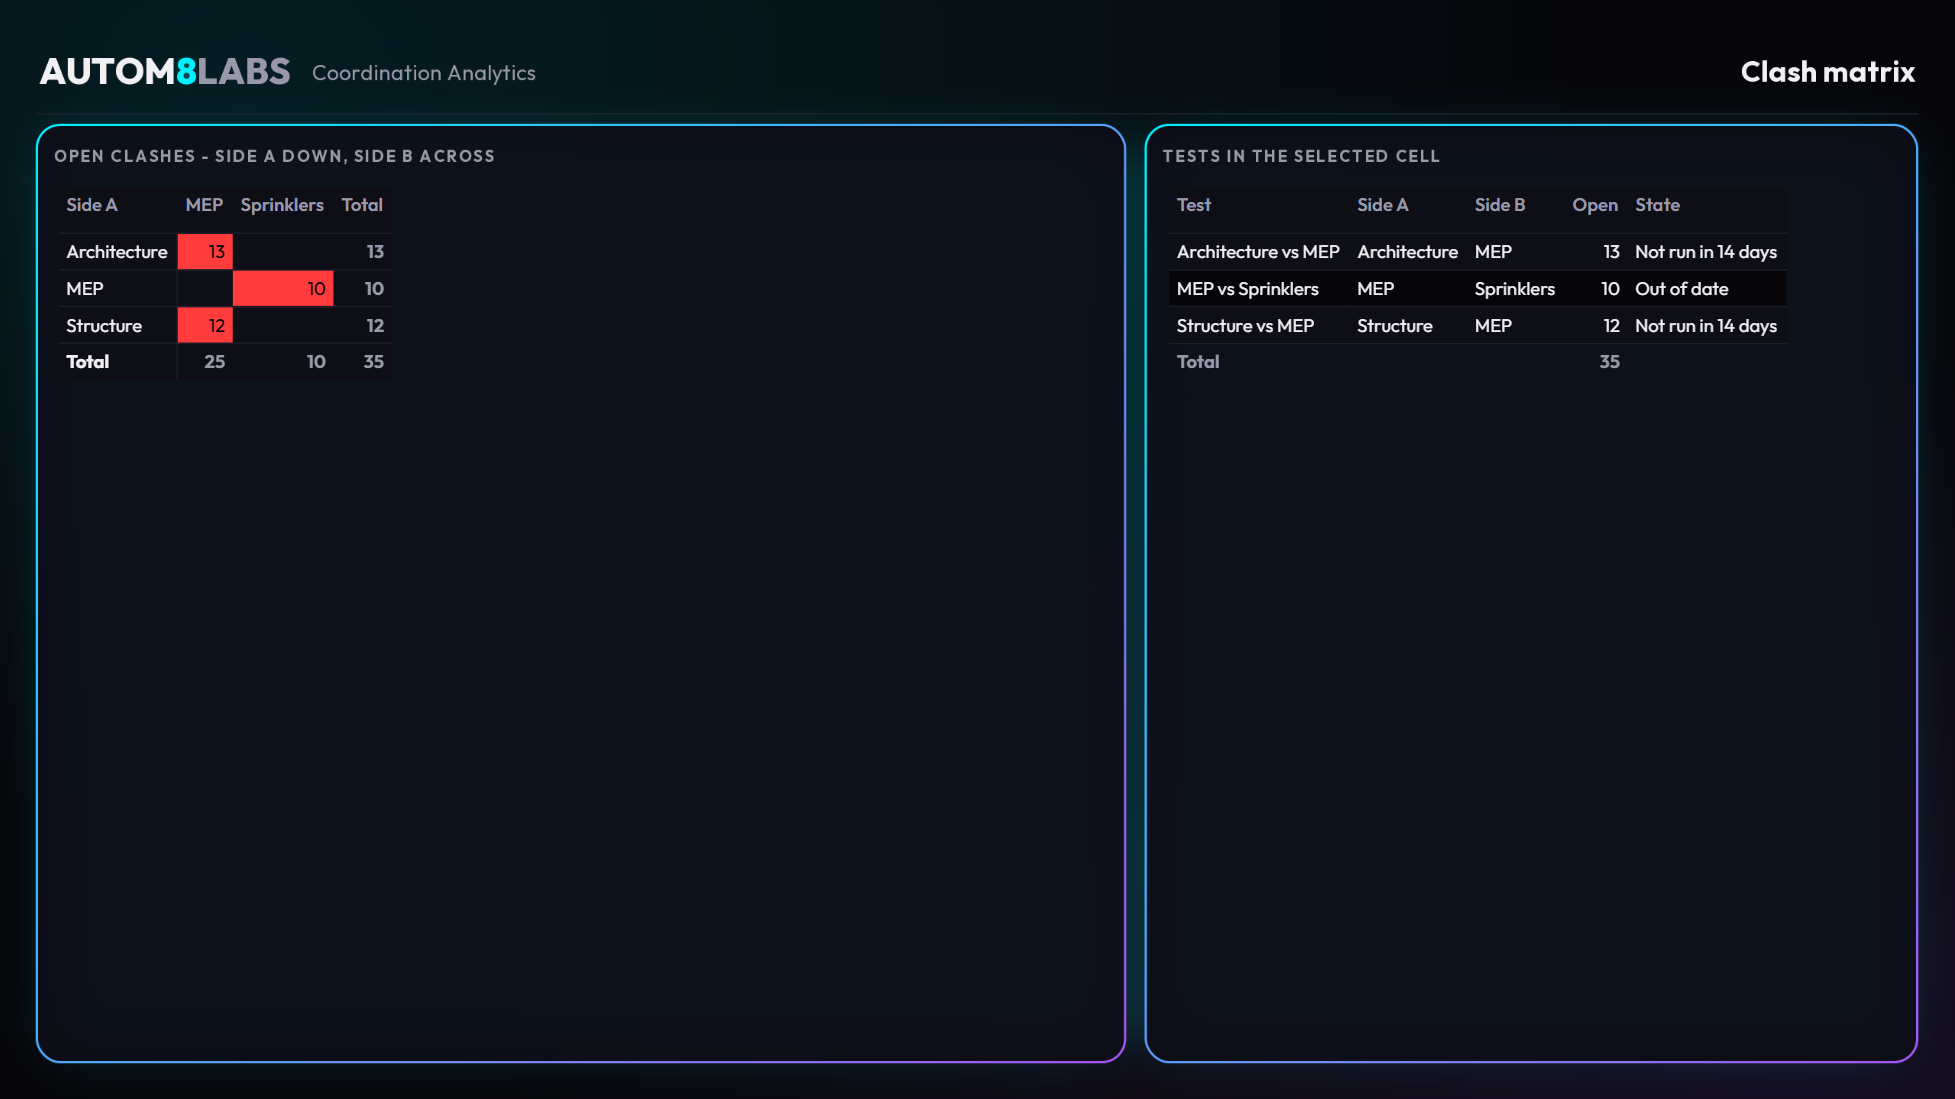
The tests and counts in the picture are invented sample data.
What you need
- Power BI Desktop, September 2026 release or later. It is free from Microsoft.
- MCP Connector for Navisworks Pro, version 1.1.0 or later, on Navisworks Manage.
- Optional, for the 3D model: the Autodesk Data Connector for Power BI, version 3.0 or later, and a Revit Data Exchange you can view. The clash pages work without it.
Set it up
- Run your clash tests in Navisworks, then ask your AI assistant: "Export the clash results to C:\AUTOM8LABS\ClashExports". The connector writes a new snapshot folder named after the time of the export.
- Unzip the download to a short path, for example
C:\AUTOM8LABS\Coordination. Power BI Desktop cannot open a file whose full path reaches 260 characters. - Open
AUTOM8LABS Coordination Analytics.pbipin Power BI Desktop. - Select Transform data > Edit parameters.
- Set ClashDataFolder to the folder you exported into. Use the parent folder, not a snapshot folder. Leave ExchangeUrl blank.
- Select OK, then Apply changes, then Refresh.
Export again after every coordination run, then select Refresh. Each export adds a snapshot and nothing is overwritten. The newest snapshot becomes the current state and the earlier ones stay in the trend.
Pages
- Overview - current totals, the status breakdown and the clash trend, with filters for test, status, level and source file.
- By test - a test by status table in the Navisworks status colours, and open clashes per test.
- Clash matrix - one cell per pair of selections, side A down and side B across, with the open clashes in the cell. Select a cell to list its tests.
- Clash detail - every clash of the selected test with both elements, their Revit Element IDs, distance, assignee and grid location.
- Coordination health - elements that could not be matched to Revit, tests that are out of date or have not run recently, and the history of every snapshot.
For a readable matrix, build your clash tests from named selection or search sets, one set per discipline or system. A side picked by hand is named by what it selects.
Optional: the 3D model
The Overview, By test and Clash detail pages have a panel for the Autodesk viewer, which shows the model coloured by clash status and highlights the two elements of a selected clash. Until it is set up, the panel shows a message asking for the visual and the rest of the page works as normal.
- Install the Autodesk Data Connector for Power BI from Autodesk.
- Publish a Data Exchange from Revit, or open an existing one in Autodesk Docs, and copy its URL.
- In Power BI Desktop select Transform data > Edit parameters, paste the URL into ExchangeUrl, select OK and then Refresh. Sign in with your Autodesk account when asked.
- In the Visualizations pane select More options (...) > Import a visual from a file and choose
Documents\Power BI Desktop\Custom Visuals\Autodesk Data Connector for Power BI.pbiviz. Save the report. This is needed once.
Elements from IFC, DWG or DGN models carry no Revit Element ID. They are still exported and counted, and appear as unmapped on the Coordination health page.
The download includes a README with the full detail. Want the dashboard in your own company branding? Contact us.
Tool Use Audit dashboard
Review AI-assisted work in Navisworks using a browser dashboard or Power BI.
Requires: MCP Connector for Navisworks Pro 1.1.0+ and administrator rights to enable logging.
Download: Tool Use Audit v1.0.0 (.zip)
1. Enable logging
Logging is off by default. On each computer, open Registry Editor as administrator. Create this key if needed, then set its values:
HKEY_LOCAL_MACHINE\SOFTWARE\AUTOM8LABS\MCPConnectorNavisworks
| Value name | Type and setting |
|---|---|
AuditLog | DWORD (32-bit): 1 |
AuditLogFolder | String (REG_SZ): your log folder, e.g. C:\AuditLogs |
Create the log folder and give Navisworks users write access. For multiple computers, use a network share. Restart Navisworks.
2. Open a dashboard
Extract the ZIP to C:\AuditDashboard or another short path. Keep its files and folders together.
- Open
audit-dashboard.htmlin Chrome or Edge. - Select Open audit folder, choose your
AuditLogFolderand allow read access.
The dashboard reads files locally and refreshes automatically.
- Open
AUTOM8LABS Connector Audit.pbipin Power BI Desktop for Windows (September 2026 or later). - Under Transform data > Edit parameters, set AuditLogFolder to your log folder.
- Select OK > Apply changes > Refresh.
Select Refresh whenever you want the latest records.
3. Check logging works
Ask your AI assistant to run get_model_info in your open Navisworks model. Wait around 30 seconds, then check for the call. Select Refresh in Power BI.
Time, user, computer, host and release, model, AI app, tool, read/write type and outcome, plus the first 300 characters of its arguments. Chat messages, full tool results and bridge-only connection calls are excluded.
Write means the tool can change a model; it does not prove a change occurred. Optional: set AuditReason (DWORD) to 1 in the same registry key, then restart Navisworks, to request a short explanation from the AI.
CSV files are saved under %LOCALAPPDATA%\AUTOM8LABS\MCPConnectorNavisworks\Audit, then copied into month folders under AuditLogFolder every 30 seconds and when Navisworks closes. Failed copies retry automatically for files updated within the last seven days.
Local copies are kept for 90 days. Files in your chosen folder are not automatically deleted. See the included README for more detail.
Want your company branding? Contact us.
Tool Reference
MCP Connector for Navisworks adds its full tool set, grouped by category below, including a read-only free tier that works without a licence. Every tool name shown is the exact identifier exposed to your AI client. The Edition column shows whether a tool is available in the free edition or needs a Pro licence. Under each description is an example prompt showing how to ask for it in natural language - click any prompt to copy it, paste it into your AI client, and adjust the names and numbers to suit your model.
Connectivity
| Tool | Example prompt | Edition |
|---|---|---|
| Report on the current session: the connector version and edition, the Navisworks release, the open document, how many tools the session offers, whether it is read-only, and the administrator policy in force. Works with no model open. | ||
get_session_info | Which connector version and edition is this, and is the session read-only? | Free |
| Check that the AI client can reach a running Navisworks session | ||
ping | Ping Navisworks and tell me if you are connected | Free |
| Read the bridge recovery block and inspection requirements. Does not inspect the host or clear the block. | ||
get_bridge_recovery | Show the current Bridge recovery state before retrying an interrupted request | Free |
| After inspecting the affected host state and confirming the uncertain operation has stopped, explicitly acknowledge its result to permit new work. Never automatically replay the operation. Requires the token returned by get_bridge_recovery after a successful inspection. | ||
acknowledge_bridge_recovery | Acknowledge the Bridge recovery token after I have checked the last operation | Free |
Model and Document
| Tool | Example prompt | Edition |
|---|---|---|
| Get an overview of the open Navisworks document: title, file name, units, number of aggregated models, and overall bounding box. | ||
get_model_info | What model is open in Navisworks and what are its units? | Free |
| Get the display units of the open document (e.g. Meters, Millimeters, Feet). | ||
get_units | What units is this model in? | Free |
| List the grid systems in the scene and their levels (name + elevation). Useful for locating clashes or elements by grid line and storey. | ||
list_grids | List the grid lines and levels in this model | Free |
| List the aggregated source models in the scene - one entry per appended file, with its source file name, units and creating application. | ||
list_models | List every model appended into this federation | Free |
| Start a new, empty Navisworks document - the first step of building a federation from scratch (then append_model for each file). If a model is currently open its unsaved changes would be lost, so the call is refused unless explicitly confirmed - the AI checks with you first. | ||
new_document | Start a new empty document | Pro |
| Open a file in Navisworks (.nwd/.nwf/.nwc or any appendable CAD/BIM format), replacing the current document. Refused while a model is open unless explicitly confirmed. To add a file to the current scene instead, use append_model. | ||
open_document | Open the coordination model on my desktop | Pro |
| Save the open model file in place, back to the path it was opened from. For a model that has never been saved, write it out with export_nwd or export_nwf instead. | ||
save_document | Save the current Navisworks file | Pro |
| Undo the most recent changes to the open model, the same as Ctrl+Z in Navisworks. Each tool call that changes the model is one step, named after the tool, and the reply names every step undone and what would be undone next. Undo up to 10 steps at once, or redo the steps just undone until the next change is made. Saved or written files are never undone. | ||
undo | Undo the last two changes you made to the model | Pro |
Properties and Query
| Tool | Example prompt | Edition |
|---|---|---|
| Count items grouped by one or two properties, optionally filtered by conditions - a whole census in one call instead of one search per combination. Grouping by category alone tallies every category; adding the source file as the second grouping returns the full category-by-file matrix, the fastest way to spot geometry duplicated across discipline models. | ||
count_items | Count every category per source file in one table | Free |
| Search the whole scene for items by property values. Give one criterion via category/property/value, or several via conditions with mode all (every condition must match) or any (items matching any condition - a union). Use list_property_categories to discover what categories exist before guessing. Returns matching items with their ids. | ||
find_items | Find every item where Category is Ducts on Level 3 | Free |
| Get the combined bounding box (min/max/center/size) of one or more items addressed by their ids. | ||
get_bounding_box | What is the bounding box of the current selection? | Free |
| List an item's ancestry in the model tree, from the model root down to the item itself (root-first), plus the source file that owns it. Useful for locating an item in the tree. | ||
get_item_ancestors | Show the model tree path for the selected item | Free |
| Read all property categories and properties of a single model item, addressed by its id (from get_selection_tree, get_current_selection, or find_items). | ||
get_item_properties | Show me all properties of the selected item | Free |
| List the property categories (and the property names inside each) that actually exist in this model, discovered by sampling items. Category availability varies by source format, so call this before building searches or search sets rather than guessing category names. | ||
list_property_categories | What property categories does this model actually have? | Free |
| List the distinct values of one property across the model, with a count of items carrying each value. The natural first step before building a set library - the distinct values of Element/Category tell you exactly which per-category search sets to create. | ||
list_property_values | List the element categories in this model with counts | Free |
Selection
| Tool | Example prompt | Edition |
|---|---|---|
| Clear the current selection so no items are selected. | ||
clear_selection | Clear the current selection | Pro |
| List the items currently selected in Navisworks, with their ids so other tools can act on them. | ||
get_current_selection | What is currently selected? | Free |
| Get the number of items currently selected in Navisworks. | ||
get_selection_count | How many items are selected? | Free |
| Walk the model selection tree. With no id, returns the top-level model roots; with an item id, returns that item's children. 'depth' expands nested children (1-5). Each node includes an id for drilling deeper or reading properties. | ||
get_selection_tree | Show me the selection tree down two levels | Free |
| Search the whole scene for items whose property matches a value, then select those items. Give the property's category and name as shown in the Properties window (e.g. category \, property \). | ||
select_by_search | Select every pipe larger than 150mm on Level 2 | Pro |
| Activate a saved selection set or search set as the current selection. Identify it by name or guid (from list_selection_sets); organising folders are searched recursively. | ||
select_selection_set | Select the set called Mechanical Level 3 | Pro |
| Set the current selection to a specific set of items, addressed by their ids (from find_items, get_selection_tree, or get_current_selection). Replaces whatever is selected. | ||
set_current_selection | Select the items I just found | Pro |
Selection and Search Sets
| Tool | Example prompt | Edition |
|---|---|---|
| Save a property filter as a named search set. Unlike a fixed selection set, a search set re-runs its query so it stays up to date as the model changes. Give one criterion or several (all must match), and optionally file the set into an existing folder. | ||
create_search_set | Create a search set for all structural steel | Pro |
| Create many search sets in one call - give an array of set specs and the whole library lands in a single transaction. Each spec has a name, an optional folder path, and conditions. Returns the match count per set; a spec that fails reports its error without stopping the others. | ||
create_search_sets | Build the whole discipline set library in one go | Pro |
| Save a fixed list of items as a named selection set so it can be recalled later. Give the set a name and the ids of the items to include, and optionally a folder to file it into. | ||
create_selection_set | Save the current selection as a set called Level 3 Ducts | Pro |
| Create an organising folder for selection and search sets, at the root or nested inside an existing folder. Create the folders first, then pass a folder to create_search_set or create_selection_set to file sets into them. | ||
create_set_folder | Create set folders for Arch, Structure and MEP | Pro |
| Delete a saved selection set or search set. Identify it by name or guid (from list_selection_sets). | ||
delete_selection_set | Delete the selection set called Old Test | Pro |
| List all saved selection sets and search sets in the document, including those nested inside folders. Each entry reports its name, its full folder path, guid and kind (folder, search, or explicit); explicit sets also report how many items they hold. | ||
list_selection_sets | List the selection and search sets in this model | Free |
Clash Detection
| Tool | Example prompt | Edition |
|---|---|---|
| Add a comment to a clash result, optionally with an author and a comment status (new, active, approved or resolved). Identify the result by its name or its zero-based index within the test. | ||
add_clash_comment | Add a comment to clash 3 saying the duct needs dropping 200mm | Pro |
| Assign a clash result to a person or trade for action. Identify the result by its name or its zero-based index within the test. | ||
assign_clash_result | Assign clash 3 to the mechanical contractor | Pro |
| Create a clash test between two selections (a clash set). Each side is the name of an existing selection or search set - sets inside folders are found by name or full path - or a list of item ids. Choose the clash type, give the tolerance in millimetres or model units, and optionally treat each composite object as one item so an element pair reports one clash instead of one per geometry solid. | ||
create_clash_test | Create a hard clash test between Mechanical and Structure at 25mm | Pro |
| Create several clash tests in one call, each with the same options as create_clash_test. The whole batch runs as a single operation and reports per-test results, so building a coordination matrix does not need a round trip per test. | ||
create_clash_tests | Set up hard clash tests for Mech, Elec and Plumbing against Structure at 25mm | Pro |
| Create saved viewpoints for a clash test in one call - one per result, or one per result group for far fewer viewpoints on a grouped test. Each camera uses the same framing as the clash result, and an optional section box around the clash is stored inside each viewpoint, so applying it cuts the model to the problem area. Requires Navisworks 2024 or later; section boxes require 2025 or later. | ||
create_clash_viewpoints | Create a sectioned viewpoint for every clash group in Mech vs Struct | Pro |
| Delete a clash test and its stored results. Identify it by name from list_clash_tests. | ||
delete_clash_test | Delete the clash test called Old Matrix | Pro |
| Export clash results as a BCF 2.1 file (.bcfzip) - one issue per clash, each with its camera viewpoint, a snapshot image, the assignee, status and comments. BCF is the open exchange format for coordination issues, so the result can be opened directly in Revit, Solibri, ACC and similar tools. Optionally filter by status so only the clashes the team agreed to action are exported. | ||
export_bcf | Export the active clashes in Mech vs Struct as a BCF file | Pro |
| Write a clash report for one test to CSV or HTML at the given path (the extension decides the format). Covers every result including those inside result groups, with status, distance, centre point, the two colliding items, assignee and description. The HTML report can embed a snapshot image per result. | ||
export_clash_report | Export the Mech vs Struct results to an HTML report with images | Pro |
| Save Clash Detective results as tables for Power BI or other reporting, one snapshot folder per run. Every result from every test, or from the tests named, becomes a row with both clashing elements resolved to the element a modeller would recognise: source model, category, family, type, level and Revit Element ID. Each test is written with the two selections it compares, which is the clash matrix as a table. Snapshots are never overwritten, so the trend can be charted across coordination runs. Feeds the Power BI coordination dashboard. | ||
export_clash_results | Export the clash results to C:\AUTOM8LABS\ClashExports | Pro |
| Navigate the camera to look at a clash result so the user can see it in the Navisworks view. Identify the result by its name or its zero-based index within the test. | ||
focus_on_clash | Take me to clash 3 in Mech vs Struct | Free |
| Save a snapshot image of one clash result to a PNG at the given path, rendered from the result's clash viewpoint. Choose the image size and style (scene, raytrace, or overlay with the clashing items highlighted). | ||
get_clash_result_image | Save a snapshot of clash 3 to my desktop | Pro |
| List the individual results of a clash test - each clashing pair with its status, distance (with units), centre point and the two colliding elements, each described by name, category, level and source file rather than the raw geometry node. Optionally filter by status and cap the count. | ||
get_clash_results | Show me the active clashes in Mech vs Struct | Free |
| Summarise one clash test: total number of results and a breakdown by status (new, active, reviewed, approved, resolved), plus when the test last ran and a warning when the stored results predate changes to the model. | ||
get_clash_test_summary | Summarise the Mech vs Struct test by status | Free |
| Group specific clash results inside a test: create a named result group and move the listed results into it. To sort a whole test into groups by grid or level in one call, use group_clash_results_by instead. | ||
group_clash_results | Group clashes 1 to 6 into a group called Level 3 Riser | Pro |
| Sort every ungrouped result in a clash test into result groups, by grid intersection, by level, or by both - the whole test in one call. Name several tests, or pass all of them, to group a federated model in one go. Group names come from a template you control, with placeholders for the grid, level, grid lines and test name. | ||
group_clash_results_by | Group the clashes in Arch vs Struct by grid and level | Pro |
| List the ignore rules on a clash test with each rule's exact name and whether it is currently enabled. Ignore rules suppress uninteresting results (for example items in the same file or the same layer). Use the names reported here with set_clash_rules. | ||
list_clash_rules | What ignore rules are on the Mech vs Struct test? | Pro |
| List the clash tests in the document. For each test, report its name, clash type, status, tolerance (with units and a millimetre conversion), the true number of individual clashes and the number of result groups, plus when it last ran and whether the stored results are stale. | ||
list_clash_tests | List the clash tests and how many results each has | Free |
| Run every clash test in the document, updating all results. Returns the number of tests run. | ||
run_all_clash_tests | Run every clash test in this model | Pro |
| Run one clash test by name, updating its results. Returns the test status and result count after the run. | ||
run_clash_test | Run the Mech vs Struct clash test | Pro |
| Set the review status of a single clash result (new, active, reviewed, approved or resolved). Identify the result by its name or its zero-based index within the test. | ||
set_clash_result_status | Mark clash 3 in Mech vs Struct as reviewed | Pro |
| Enable or disable ignore rules on a clash test, so a run stops reporting results the team does not want to see (for example clashes between items in the same file). Name rules exactly as list_clash_rules reports them. Re-run the test afterwards for the change to affect results. | ||
set_clash_rules | Turn on the rule that ignores items in the same file | Pro |
| Update an existing clash test: rename it, change its tolerance (in millimetres or model units), change its clash type, or toggle composite object clashing. Only the fields given are changed; the test's selections and stored results are kept. Changing tolerance, type or composite clashing makes the stored results stale - re-run the test afterwards. | ||
update_clash_test | Tighten the Mech vs Struct tolerance to 15mm | Pro |
Sectioning
| Tool | Example prompt | Edition |
|---|---|---|
| Turn off all sectioning (box or planes) so the whole model is visible again. Reverses set_section_box and set_section_plane. Requires Navisworks 2025 or later. | ||
clear_sections | Turn sectioning off | Pro |
| Report whether sectioning is currently on, whether it is a box or planes, the box extents when in box mode, and which individual planes are enabled. Requires Navisworks 2025 or later. | ||
get_section_state | Is sectioning currently on? | Pro |
| Section the view to a box so everything outside it is cut away - the usual way to look inside a congested area such as a riser or plant room. Give an explicit min/max box, or set from_selection to box the current selection. Use clear_sections to remove. Requires Navisworks 2025 or later. | ||
set_section_box | Section a box around the current selection with 500mm padding | Pro |
| Section the view with a single plane aligned to a side (top, bottom, front, back, left, right or view), cutting away everything beyond it - use for a quick cut through a level or a wall line. Use clear_sections to remove. Requires Navisworks 2025 or later. | ||
set_section_plane | Cut a section plane through the top at level 12000 | Pro |
Appearance and Visibility
| Tool | Example prompt | Edition |
|---|---|---|
| Hide one or more items, addressed by their ids, so they no longer show in the scene. Use unhide_all to bring everything back. | ||
hide_items | Hide the selected items | Pro |
| Isolate a set of items: hide everything else in the scene and show only these items, addressed by their ids. Use unhide_all to restore full visibility. | ||
isolate_items | Isolate the current selection | Pro |
| Override the colour and/or transparency of one or more items, addressed by their ids. Give an RGB colour (each channel 0-255) and/or a transparency from 0 (opaque) to 1 (invisible). Use reset_appearances to clear. | ||
override_appearance | Colour the selected ducts red at 50% transparency | Pro |
| Clear every colour and transparency override in the scene, returning all items to their original appearance. | ||
reset_appearances | Reset all appearance overrides | Pro |
| Set the background of the Navisworks scene view: a plain colour, a two-colour graduated wash, or a sky-and-ground horizon. Use before capture_view_image when a specific look is wanted for a screenshot. | ||
set_background | Give me a dark graduated background for screenshots | Pro |
| Make every hidden item visible again, reversing any hide_items or isolate_items calls. | ||
unhide_all | Show everything again | Pro |
| Make specific hidden items visible again, addressed by their ids, without unhiding anything else. Use this instead of unhide_all when other items should stay hidden. | ||
unhide_items | Unhide just those two doors | Pro |
Viewpoints
| Tool | Example prompt | Edition |
|---|---|---|
| Move the current view to a saved viewpoint. Identify it by name or guid (from list_saved_viewpoints); organising folders are searched recursively, and a full folder path also works. A viewpoint saved with a section box restores the box along with the camera. | ||
apply_saved_viewpoint | Go to the viewpoint called Level 3 Riser Clash | Pro |
| Save the current view as a named viewpoint so it can be recalled later. Give the viewpoint a name. | ||
create_saved_viewpoint | Save this view as Level 3 Riser Clash | Pro |
| Delete a saved viewpoint. Identify it by name or guid (from list_saved_viewpoints); organising folders are searched recursively, and a full folder path also works. | ||
delete_saved_viewpoint | Delete the viewpoint called Old View | Pro |
| Read the current view's camera: its position, the direction it looks in, the up vector, and whether it is a perspective or orthographic projection. | ||
get_current_viewpoint | Where is the camera right now? | Free |
| List all saved viewpoints in the document, including those nested inside organising folders. Each entry reports its name, its full folder path, guid and kind (folder or viewpoint). | ||
list_saved_viewpoints | List the saved viewpoints | Free |
Viewpoint Animations
| Tool | Example prompt | Edition |
|---|---|---|
| Create a camera fly-through animation from an ordered list of saved viewpoints - the camera moves through them in the order given. Useful for a walkthrough of a coordination area or a review route. Note this is a viewpoint (camera) animation; object animation via the Animator is not scriptable, and rendering the result to video is done in Navisworks itself. | ||
create_viewpoint_animation | Build a fly-through through my four saved coordination views | Pro |
| Delete a camera fly-through animation by name, along with its frames. | ||
delete_viewpoint_animation | Delete the animation called Old Walkthrough | Pro |
| List the camera fly-through animations saved in this model, with how many viewpoint frames each holds and whether it loops. | ||
list_viewpoint_animations | List the animations saved in this model | Pro |
Navigation and Capture
| Tool | Example prompt | Edition |
|---|---|---|
| Save a snapshot of the current 3D view as a PNG image at the given path. Useful for sharing what the view looks like right now. | ||
capture_view_image | Save a screenshot of the current view | Pro |
| Move the camera to a position and aim it at a target point, keeping Z as the up direction. Coordinates are in the document's units. | ||
set_camera | Put the camera above the building looking down | Free |
| Zoom the current view to fit one or more items, addressed by their ids (from find_items, get_selection_tree, or get_current_selection). | ||
zoom_to_items | Zoom to the items I just found | Free |
| Zoom the current view to fit whatever is currently selected. | ||
zoom_to_selection | Zoom to what is selected | Free |
Measurement
| Tool | Example prompt | Edition |
|---|---|---|
| Measure the straight-line distance between two 3D points, with per-axis deltas. Coordinates are in the model's units. | ||
measure_points | How far is it between these two points? | Free |
4D Construction Sequencing
| Tool | Example prompt | Edition |
|---|---|---|
| Create a construction sequence (TimeLiner) task with planned dates and a task type (Construct, Demolish or Temporary), and optionally attach the model items it drives - either a named selection or search set, or explicit item ids. This is how a 4D sequence gets built. | ||
create_timeliner_task | Create a Construct task called Level 3 Ductwork starting 1 Sept for two weeks | Pro |
| Delete a construction sequence task by name. Removes the task and any sub-tasks beneath it. | ||
delete_timeliner_task | Delete the task called Old Sequence | Pro |
| Attach model items to an existing construction sequence task, replacing whatever it was linked to. Give either a named selection or search set, or explicit item ids. Use this to wire an imported programme up to the model. | ||
link_timeliner_task | Attach the Level 3 Ducts set to the Level 3 Ductwork task | Pro |
| List the simulation task types available in this model (typically Construct, Demolish and Temporary) with the appearance status each applies at the start and end of a task. Use these exact names for the task_type parameter of create_timeliner_task. | ||
list_timeliner_task_types | What task types are set up in this model? | Pro |
| List the construction sequence (TimeLiner) tasks with each task's name, status, planned/actual start and end dates, and task type. Walks the full task tree. | ||
list_timeliner_tasks | List the construction sequence tasks and their dates | Free |
| Update an existing construction sequence task: rename it, change its planned or actual dates, or change its task type. Only the fields given are changed; the task's attached items are left alone (use link_timeliner_task to change those). | ||
update_timeliner_task | Push the frame erection end date to 1 November | Pro |
Quantification
| Tool | Example prompt | Edition |
|---|---|---|
| Export the model's quantification (takeoff) data to a CSV for cost analysis in Excel - choose the takeoff objects (the measured quantities), the catalogue items, or the resources. Requires a quantification project that has already been set up and taken off in Navisworks; quantities cannot be created through the API. | ||
export_quantities | Export the takeoff quantities to a CSV on my desktop | Pro |
| Summarise the quantification (takeoff) project in the open model: currency and setup, counts of catalog items, item groups, takeoff objects, resources and steps, and a sample of catalog item names. Returns an error when the model has no quantification project. | ||
get_quantification_summary | Is there a quantification project in this model? | Free |
Review and Comments
| Tool | Example prompt | Edition |
|---|---|---|
| Add a review comment to a saved selection set or saved viewpoint, addressed by its display name (folders are searched recursively). Optionally set the author and a status. | ||
add_comment | Add a comment to the selected item | Pro |
| Read the review comments on a saved selection set or saved viewpoint, addressed by its display name (folders are searched recursively). Each comment reports its body, author, status and creation date. | ||
get_comments | Show the comments on this clash | Free |
Export and Publish
| Tool | Example prompt | Edition |
|---|---|---|
| Append (aggregate) another CAD, BIM or scan file into the current scene by path (e.g. NWC, NWD, RVT, IFC, DWG). Merges it with the models already loaded. | ||
append_model | Append the structural model into this federation | Pro |
| Write the model tree to a CSV (columns: Depth, Id, DisplayName, ClassName, HasGeometry), walking each model's hierarchy down to a maximum depth. | ||
export_model_tree | Export the model tree to a file | Pro |
| Save the scene as an NWC cache at the given path. NWC is the compact cache format used to aggregate models into a coordination scene. | ||
export_nwc | Export the current model to NWC | Pro |
| Save the whole scene to an NWD file at the given path. An NWD bundles all geometry and review data into a single self-contained file you can hand off. | ||
export_nwd | Export this federation as an NWD | Pro |
| Save the scene to an NWF file at the given path. An NWF references the appended source files rather than embedding their geometry, so it stays small and updates when the sources change. | ||
export_nwf | Save this as an NWF | Pro |
| Write the property categories and values of items to a CSV (columns: Item, Category, Property, Value). Uses the given item ids, or the current selection when no ids are supplied. | ||
export_properties | Export the properties of the current selection | Pro |
| Publish the scene to a read-only NWD file with embedded title, author and comments. Use for distributing a locked, self-contained review deliverable. | ||
publish_nwd | Publish an NWD with the title set to Level 3 Coordination | Pro |
Troubleshooting
The AI says it is not connected to Navisworks
- Navisworks must be running. The connector talks to a live session; it cannot start Navisworks for you - although once Navisworks is open, the AI can open or append model files itself.
- In Navisworks, open the AUTOM8LABS ribbon tab and click MCP Connector to check the connection and configure your AI apps.
- Ask your AI to run the
pingtool. It reports whether the link is up and, if not, why.
The plug-in did not load
- The plug-in auto-loads when Navisworks starts. If the AUTOM8LABS tab is missing, restart Navisworks and check the startup log at
%LOCALAPPDATA%\AUTOM8LABS\MCPConnectorNavisworks\Log\. The connector's commands also remain available under the Tool add-ins tab as a fallback. - Confirm the bundle exists at
C:\ProgramData\AUTOM8LABS\MCPConnectorNavisworks. If it is missing, re-run the installer. - Check that your Navisworks release is between 2022 and 2027.
Pro tools are missing after activating
- The MCP server reads the edition once, when the AI client starts it. Restart the AI client after activating and the full tool list appears.
- Confirm the licence state in Navisworks via Manage Licence on the AUTOM8LABS ribbon.
The AI client does not list the server
- Restart the client completely after installing; a window reload is not always enough.
- For clients other than Claude Desktop, ChatGPT Desktop, and Cursor, add the manual configuration yourself.
FAQ
Changelog
- Live licence discovery. The Bridge gets tool availability from the running plug-in, so a stale Free manifest no longer hides tools from a licensed Pro session. The local manifest remains the fallback when the host cannot be reached.
- Licence enforcement. Improved consistency when licence state changes. Paid operations still require entitlement in the native plug-in; tool discovery does not grant it. Existing signed offline allowances remain supported.
- Save results. NWF/NWD exports and in-place saves no longer report a false failure after their own successful filename or document-state change. Requests aimed at an outdated document are still refused before execution.
Power BI dashboards, undo, read-only sessions, administrator tool permissions and a tool use audit log
- New: Power BI coordination dashboard.
export_clash_resultssaves Clash Detective results as snapshot tables, and a ready-made Power BI report charts them: totals, the trend between coordination runs, clashes by test, a clash matrix, clash detail and health checks - New:
undo. Steps back through the changes the AI made to the model, up to 10 at a time, with redo. Each step is named after the tool that made it - New: read-only session. A checkbox in the connector dialog leaves only the free review tools. Every other tool is withheld from the session, and refused by name if it is called.
- New: administrator tool permissions. An administrator can block named tools, allow only an approved list, or force read-only for every user of a computer. Registry examples are a free download. See Administrator Tool Permissions
- New: Group Policy. The installer provides a Group Policy template, so the same permissions can be set for computers or for chosen users through Group Policy or Intune. A user policy can only tighten what the computer allows
- New: tool use audit log. When an administrator switches logging on, each tool call is recorded with its time, user, computer, model, AI app and outcome. A free browser dashboard and Power BI report read the records. Logging is off by default. See Tool Use Audit dashboard
- Clash matrix.
list_clash_testsnow reports the two selections each test compares, and a test created from set names stays linked to those sets instead of copying their items - New
get_session_inforeports the connector version and edition, the Navisworks release, the open document, and whether the session is read-only or under an administrator policy - Clash viewpoints: a viewpoint saved with a section box is framed on the box
- Setup: the installer now waits for Navisworks to close before it installs
Batch clash authoring, and more AI clients
- New
create_clash_testsdefines a whole set of clash tests in one call and one operation, reporting per-test results instead of needing a round trip each group_clash_results_bynow accepts a list of tests, or all of them, so a federated model can be grouped by level or grid across every test at once- More AI clients: one-click setup now covers GitHub Copilot in VS Code and Visual Studio, the Copilot CLI, and Grok Build, alongside Claude Desktop, ChatGPT, Codex and Cursor
- Dependency refresh: the bridge runtime and its dependency set were updated; no component ships with a known advisory at any severity
Stability fix for clash detection, licence activation through authenticating proxies
- Fixed:
run_all_clash_testson a model with no clash tests closed Navisworks. It now reports that there are no tests to run - Licence activation now works on networks that route through a proxy requiring sign-in, and the connector's diagnostics name the real cause when the licence server cannot be reached
- The installed connector version is shown in the connection dialog
Security hardening and update check removed
- Security hardening of the connector's local communication channel and its diagnostics
- Diagnostic logging is now off by default. Set
MCPCONNECTOR_LOG_ENABLED=1and restart Navisworks to collect a log for support - The in-product update check is removed. The connector no longer checks for updates and no longer contacts a version endpoint. Outbound network calls are limited to licence activation, deactivation and validation. Check the Autodesk App Store or the product page for new releases
Coordination update - fourteen new tools, batch workflows and clearer clash reporting
- New
count_itemscounts items grouped by one or two properties in a single call - a whole category-by-source-file census that used to take dozens of searches - New
create_search_setsbuilds a whole set library in one call and one undo step, with a match count per set - New
create_clash_viewpointssaves a viewpoint per clash result or per result group in one call, optionally with a section box around each clash stored inside the viewpoint (boxes on Navisworks 2025 or later) - New
delete_clash_testremoves a test and its results - Clash tests can now reference search sets inside folders, by name or full folder path, and composite object clashing can be switched on so an element pair reports one clash instead of one per geometry solid
- Metric and imperial both safe: tolerances, section box sizes and padding accept millimetre values directly and are converted to the document units by the connector
- Saved viewpoints inside folders are now listed with their full paths and can be applied and deleted by name or path
- Clash results now name the colliding elements - name, category, level and source file - instead of raw geometry nodes, and every distance and tolerance carries its units with a millimetre conversion
- Clash counts report the true number of individual clashes even when results are grouped, and out-of-date results are flagged with a warning until the test is re-run
- New
group_clash_results_bysorts a whole test into result groups by grid intersection and/or level in one call, with the group naming convention under your control - Build a federation from scratch:
new_documentandopen_documentjoinappend_model - Organise the set library: create set folders, file sets into them, build multi-condition search sets, and discover the model first with
list_property_categoriesandlist_property_values - Revise without recreating:
update_clash_test(name, tolerance, type),update_timeliner_task(name, dates, type) and selectiveunhide_items set_backgroundapplies a plain, graduated or horizon background before capturing screenshots- Activating a Pro licence now takes effect in the connected AI client within seconds - no reconnect needed
- Reliability:
run_clash_testno longer reports an error after a successful run, the bridge process exits cleanly when the AI client closes, and the licence dialogs render consistently with the rest of the product - Installer: reinstalling the same version no longer forces an uninstall, so activation is preserved
Autodesk App Store release
- First release on the Autodesk App Store
- Clash authoring tools correctly require Navisworks Manage; Simulate keeps the read-only clash review
- Licensing hardening
Reliability and installer update - recommended for everyone
- Fixed the plug-in not loading after installation. If you installed v1.0.0 and the connector never appeared in your AI client, this update resolves that - please reinstall
- Choose which Navisworks versions (2022-2027) to install for, with installed versions detected automatically
- Appending the first file into an empty scene now works, so the AI can build a federated model from scratch
- Silent, unattended installation for enterprise deployment, with a matching silent uninstall
First release
- Drive Navisworks Manage and Simulate 2022-2027 from any MCP client with natural language - a free read-only review tier plus the full Pro coordination tool set